Giving my readers tutorials is one of my favorite writing assignments. Stenciling is an art form that I was taught absolutely for free many years ago, so I think it's only right for me to pass it on to you at no charge.
Today I will show you how I painted "Sweet Dreams" on the wall above a bed in our guest room. While I could have bought a stencil with those words, it is more economical to buy an alphabet and line up the letters myself. That way I get repeated use from the stencils. A stencil set that has only one phrase is usually used only once in a house and then what do you do with it?
You may say that lining up the letters is hard, but as I will show you here, anybody can do this and it takes very little additional time.
 |
| Start with a stencil and blue painter's masking tape. Don't use the beige kind of tape -- the blue is easily removed, leaves no residue, and can be used repeatedly as you paint your project -- all very important! |
 |
| On plain paper use a pencil and your stencil to write out your message. Pay attention to how much space you want between each letter and then be consistent. When you are done with this, you will know how much space to allow on the wall for your message. |
 |
| Cut a strip of the blue masking tape the length of your message, then apply it to the wall, using a level to be sure it is lined up straight. |
 |
| If you have not stenciled before, you will be amazed at how little paint this requires. I use the acrylic paints in bottles like this, found at JoAnn Fabrics and Crafts, Hobby Lobby, Michaels, etc. For my lettering in this project, I chose Folk Art 459 Hauser Green Light. |
 |
| You can use a fun painter's pallet like this but a tin pie pan works every bit as well. Make a little puddle of the paint, oh, about the size of a quarter. Since my stencil design is small (narrow letters), I am using a fine make-up sponge. You don't want to use a sponge with large holes for this project. |
 |
| Dab your sponge into the quarter-sized paint puddle, and then tap it on a folded paper towel. To stencil paint you use a fairly dry sponge. Oh by the way, I don't get my sponge wet before dipping into the paint. But if you do, be sure to squeeze out as much moisture as you can before getting into the paint. |
 |
| Hmm. I should have posted this picture before I started talking about paint and sponges. The horizontal blue tape is my base line. You can see how I have lined up the S on that line. The tape at the top is just holding the stencil so I can use both of my hands to paint (or take snapshots!). |
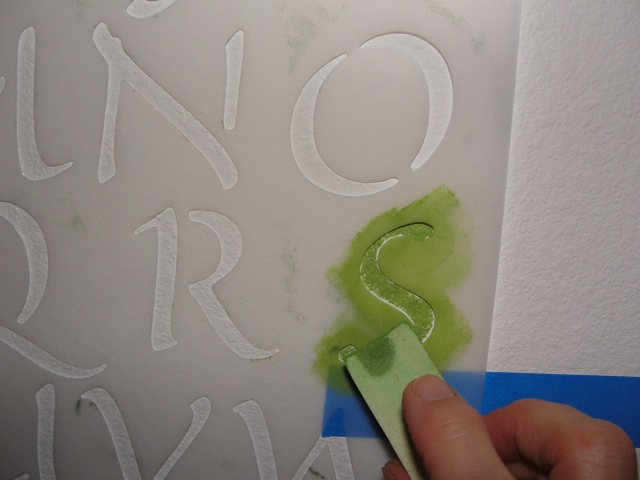 |
| Apply the paint with a daubing motion, up and down. DO NOT GO BACK AND FORTH or you will get paint underneath the stencil and the result will be a blurry image. Again, it is important to have a pretty dry sponge for this. |
 |
| Reposition the stencil as necessary to get the letters lined up on the blue horizontal base line. Be sure to be consistent with the spacing of the letters. This kind of paint dries very quickly, so you can lay the stencil on top of the painted areas almost immediately. Sometimes I blow on the freshly-painted letters to hurry things along. |
 |
| I could have left the letters alone, as they are above; but I don't like that stenciled look in the letters, where there is a break in the lines (examine the W, D, R, A, M). |
 |
| To remedy that problem, I use a very small paint brush to connect the lines. |
 |
| There! That's much better. |
 |
| But now those 'sweet dreams' are just floating on a great big white wall. The design needs more. |
 |
| Anybody who has been to my house knows that I'm a nut for stenciled ivy. It flows on the walls of the majority of our rooms. Beloved has said for years that he's afraid the vines will some day choke him in the night! |
 |
| I do all of the ivy in a casual, flowing style, turning the stencil in whatever way that will accomplish the look I want. With the bigger leaves, I start out by concentrating the paint on the outer edges of the leaf, leaving some of the center untouched. This is because I will be adding a second color in the bare spots for shading. |
 |
| Folk Art 467 Italian Sage is one of my favorites. I use it a lot. |
 |
| The Italian Sage is applied to the centers of the leaves for dimensional color. |
 |
| Here we are, so far. |
 |
| Now we are working on the other side. |
 |
| The green is lovely, but I wanted just a touch of red berries to make the design more interesting. Delta Ceramcoat Barn Red 02490 |
 |
| I taught myself this next trick, so I'm kinda proud of it. My berries will be tiny dots in clusters, so a paint brush won't work, and a stencil is too much bother. I chose the wood handle end of one of the paint brushes ... |
 |
| ... quickly dipped it into the red paint .... |
 |
| ... and then made quick dots with an up-and-down motion. |
 |
| I always make the dots in clusters of 3 or 5. This is a quick motion, don't rest your 'pointer' long at all or you will get a disagreeable blob. |
 |
| My project is done. I'm trying to decide if the design is still sort of lost on that big wall, but I'd rather quit while I'm ahead. If I paint too much, then I have to haul out the big can of primer, allow it to dry, determine if another coat is needed, then apply the wall paint -- a lot of fuss for being over-indulgent! |
No comments:
Post a Comment